11.3. Firewall Rules (Forward and Input)
Firewall Rules are the core of the VT AIR Firewall. When you open the Rules site you can see that Firewall Rules are grouped by interface. The interface is the incoming interface, meaning the interface the traffic enters the firewall first.
For example if your computer is behind LAN and the internet behind WAN and you are going to visit a website, then the traffic originates from your computer and enters the firewall on the LAN interface first. A firewall rule to allow the traffic has to be defined on LAN. A backwards rule is not necessary, since the firewall will create a state which will keep track of the open connection. The backwards connection from the WAN to LAN is implied and allowed.
There are also Global Firewall Rules (Forward and Input) which are more flexible and have the option to set the incoming and outgoing interface or set them to any.
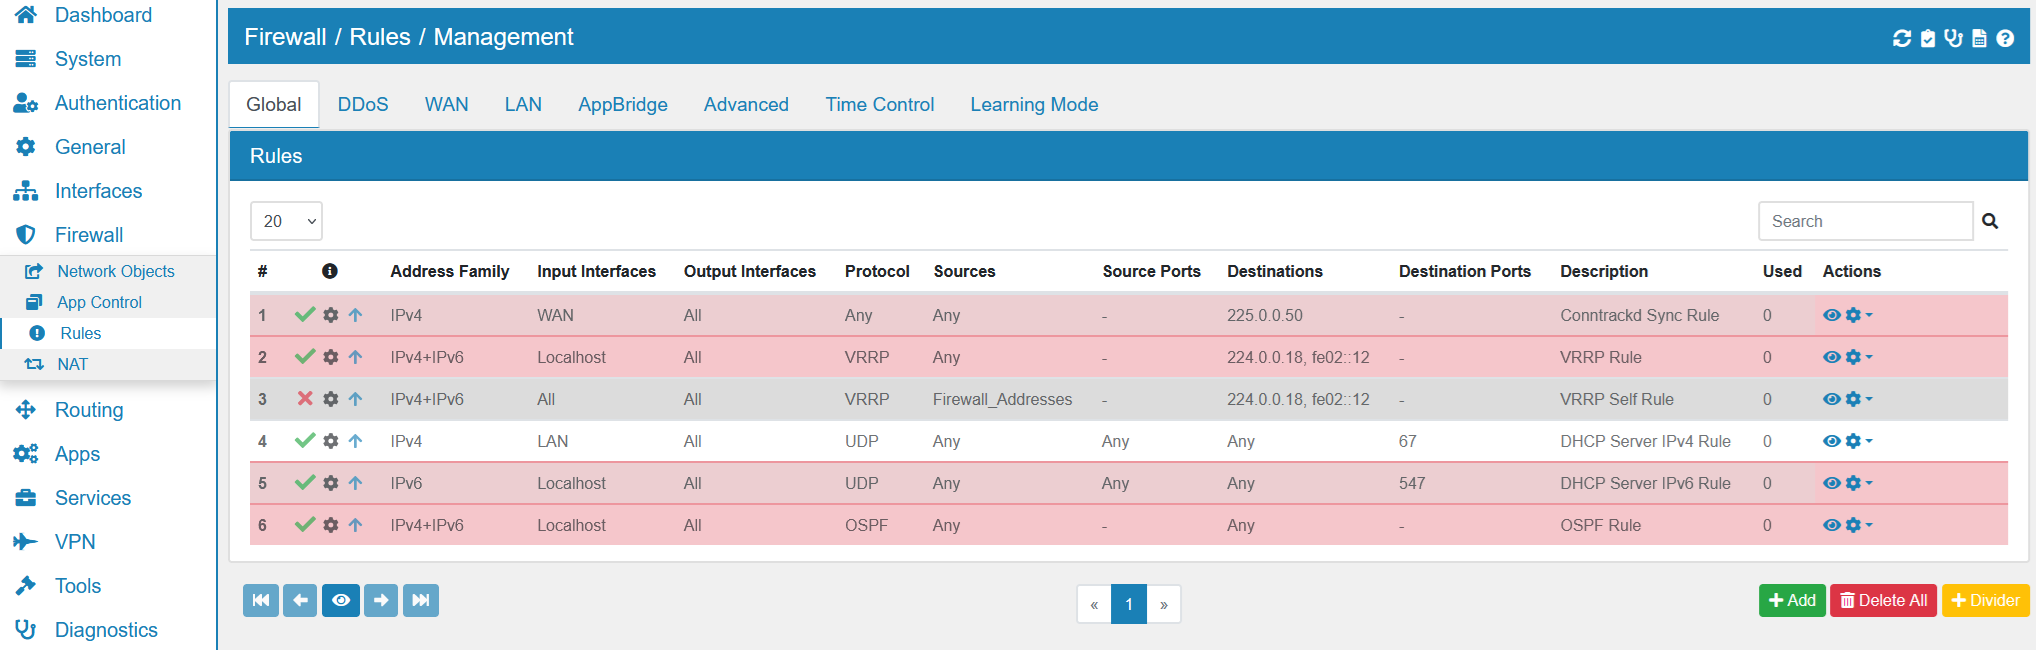
On each Firewall Rule page you will see the builtin rules with a gray background. You can not change them or move them. Only user created rules can be changed.
You can export the settings in the top right corner as an Excel spreadsheet.
11.3.1. Move Rules
Rules are gouped by interface and are paged in groups of 20 rules. You can drag and drop user created rules to a different position and you can save that position by pressing save on the bottom navigation. You can also move a rule to the next or previous page or the first or last page if you mark the rule on the left (click on the first cell of the firewall rule) and use the arrows on the bottom left. If you hover over the buttons they will also show you their description.
11.3.2. Delete All
Rules can be deleted per Interface or Selected Tab in the GUI. Press the Delete All Button in the lower right corner to delete all rules. Please be careful, the rules can not be recovered after deletion. If you already marked a firewall rule then only that rule can be deleted and not all rules. Deleted Rules do not close already active connections. Please go to States to close already active connections.
11.3.3. Create and Update Rules
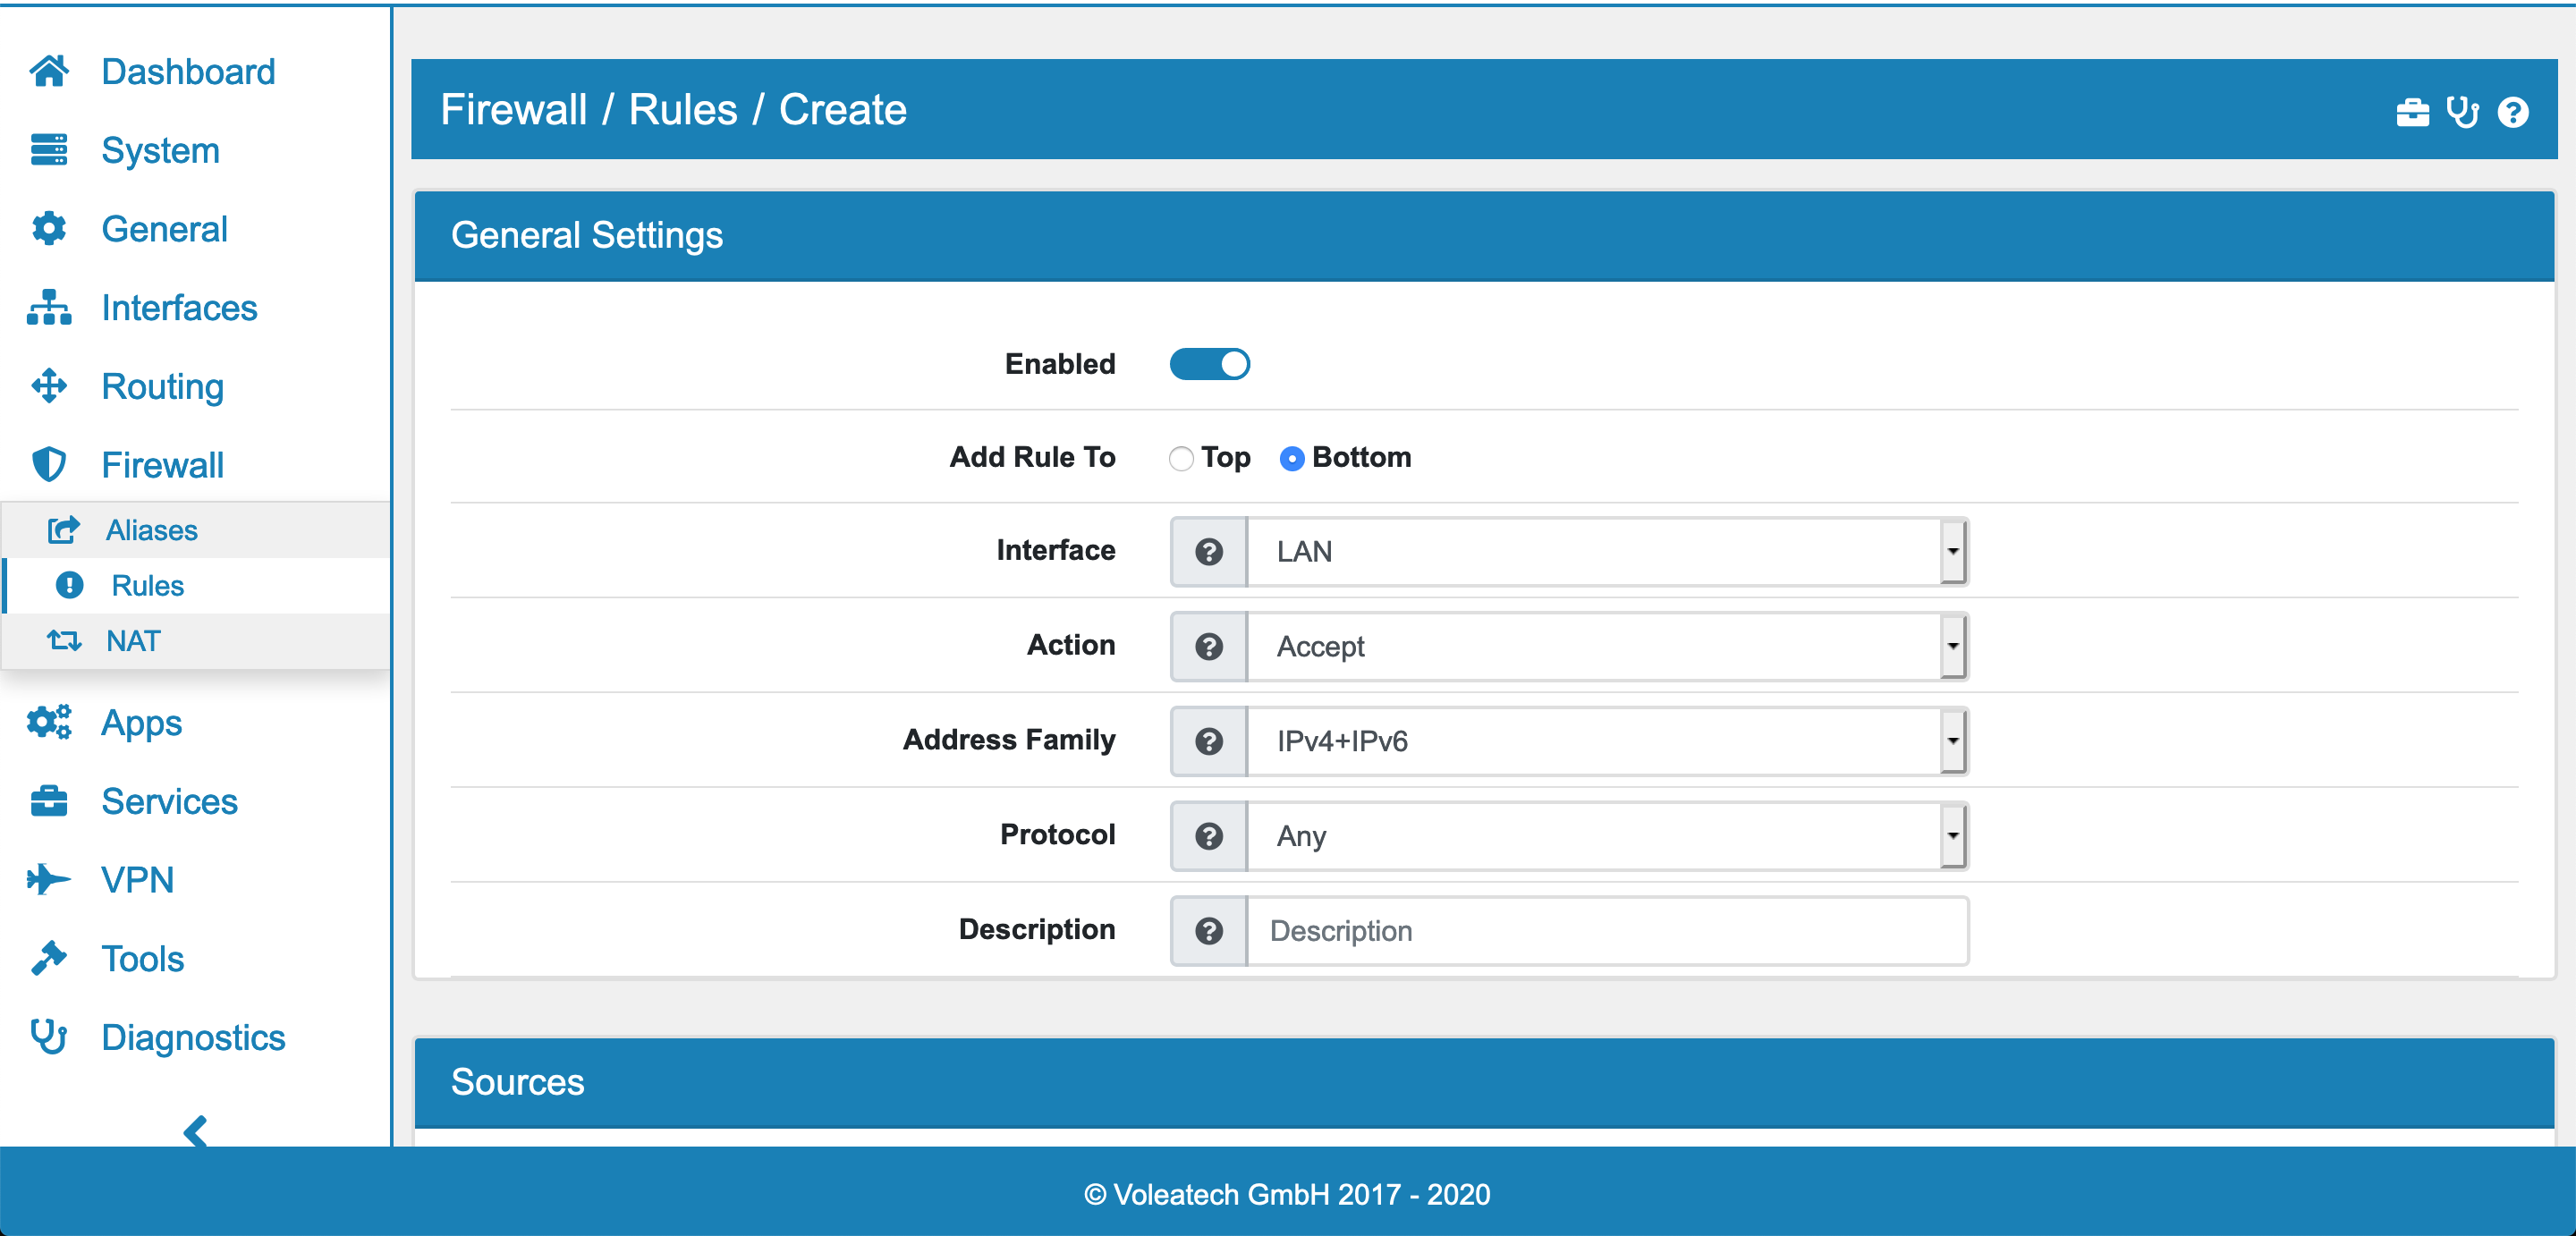
If you click Add you will create a new rule on the current interface where you are. You have various options for the rule to set and the rules are structured by the following sections:
General Settings
ICMP Settings
Sources
Destinations
Advanced
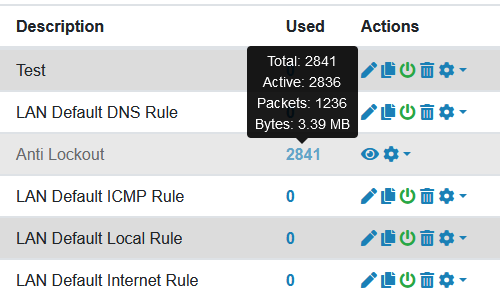
11.3.4. Used Rules
On every Firewall Rule page you can see how often a Firewall Rule was used. If you hover over the number, you can also see the total amount of states as well as the active ones. It also shows, how many packets were affected by the rule and their size in bytes.
11.3.4.1. General Settings
You can change the following options here:
Enabled Enable or Disable the rule
Interface You can change the Interface of this rule. It will be added to the end of the rule list of that interface if you change it.
Action We have three actions defined here:
Accept
Drop (Silently drops the package)
Reject (Send back a reject ICMP message)
Address Family Is either IPv4, IPv6 or both. Depending on the sources and destinations you define the system might not generate a rule for both if you choose IPv4+IPv6.
Protocol The Layer 2 Protocol of the rule.
11.3.4.2. ICMP Settings
If you choose ICMP as protocol you can also filter by ICMP Type here.
11.3.4.3. Sources
The Source setting has options for the Source IPs, Source Mac Addresses and if applicaple Source Ports. You can also use hostnames (DNS entries) instead of Source IPs. You can add muliple entries of each and also mix IPv4 and IPv6. The system will figure out the rule for you.
Source Mac Addresses and Source Ports can be found under Advanced Source Settings.
The Invert IP Match option will invert IPs and Macs as well as the ports.
11.3.4.4. Destinations
The Destination setting has options for the Destination IPs and if applicaple Destination Ports. You can also use hostnames (DNS entries) instead of Destination IPs. You can add muliple entries of each and also mix IPv4 and IPv6. The system will figure out the rule for you.
Note
To match INPUT rules to the firewall, you need to use the Network Objects Address or Network of each Interface. It is not enough to type the IP Address of the interface as destination. The destination will be added as a forward rule and not input.
The Invert IP Match option will invert IPs as well as the ports.
Be aware that due to the structure in Firewall Flow you have to explicitly choose the Interface IP Network Object if you want the destination to be the firewall itself. Custom IPs or Network Objects are not recognized.
11.3.4.5. Advanced
In the Advanced Settings you can configure a couple of extra options.
Logging You can log the rules traffic, it will log the initial packet that is seen when the state is created or the connection started.
Force Input Rule This option will make this rule an Input rule so the firewall is the destination with whatever IP you set in the destination field. Usually VT AIR will try and figure out if it needs to put the rule into Input or Forward or both. This will override the detection and only put the Rule in Input.
Stateless If set no state is created for this connection. You must create a second rule for the return traffic. This is mostly needed for asymmetric routing.
Trace To show packets that match this rule in real time enable the trace option. The trace will make the processing of the rule slower but you can debug problems. Disable the trace after debugging. The matching packets can be seen in Trace.
Limit Limit the rule. You can set for how many matches the rule should be active for a given time. It can be a speed (KBit/MBit/Byte/KByte/MByte) or time in packages per second/minute/hours. Please also refer to QoS for more explanations.
TCP Flags If the protocol is TCP you can also filter by TCP Flags.
TCP MSS If the protocol is TCP you can also set the MSS. This might be necessary if the MTU is smaller than ususal. This setting is also available on a per Interface basis in the Interface Settings.
Routing Table Choose a different Routing Table for matches. The main routing table is used by default. This allows for Policy Routing. Matching traffic will use the selected routing table.
Routing Table Reverse Main Use the Main Routing Table for the reverse direction of the connection. This is needed for Policy Routing as the local LAN route is in the main routing table. In that case the reverse direction is WAN to LAN.
Bypass IDS/App Control The matching traffic will not be inspected by the Intrusion Detection/App Detection engine.
QoS Class Input The class used for input shaping on any interface this traffic is passing and that has QoS enabled. Be aware that the directions must be assigned accordingly. If you create a rule on LAN to be shaped on WAN, make sure that QoS is active on WAN and you pick the correct class that you want to have for WAN. Unline QoS Output, QoS Input can only configured for non Bridge members.
QoS Class Output The class used for output shaping on any interface this traffic is passing and that has QoS enabled. If you create a rule on LAN to be shaped on WAN, make sure that QoS is active on WAN and you pick the correct class that you want to have for WAN.
DSCP Types Differentiated services code point (DSCP) for QoS in the IP or IP6 Header. You can match the different types with this option. The option is only matched when a new firewall state is created on the first packet of the connection. Afterwards any change of the DSCP Type is not recognized for an open firewall state.
Time Control The firewall rule will only be active during that time. You need to create time objects in the Advanced Settings first.
Raw Data The Raw Data will be appended to the generated firewall rule. Please be careful as wrong input will prevent the firewall rules from beeing loaded. Please refer to the nftables syntax for the format.
11.3.4.6. Changes
At the bottom of each rule you can see the Created date, Modified date and the user that last modified the rule Modified user.
11.3.5. Hostnames in Rules
We support hostnames in rules as destination or source. Be aware though that they MUST be resolvable when the firewall rules are loaded, applied or reapplied. The firewall rules CAN NOT be updated, if there is no working DNS. The reload will fail and leave the old ruleset in place.
11.3.6. Search
In the top right corner of the overview page you can search for rules. As search value you can use protocol, source, destination, IP address, port or description.
11.3.7. Convert Firewall Rules
In the actions column on the right side of the overview page you can convert firewall rules. You can convert a Global Firewall Rule to an Interface Firewall Rule and vice versa. When converting a Global Firewall Rule a popup dialog will let you select an interface.
11.3.8. TCPDump
In the actions column on the right side of the overview page you can start a TCPDump for a firewall rule. A popup window will appear and show the result in realtime.
11.3.9. Trace
In the actions column on the right side of the overview page you can start a Trace for a firewall rule. A popup window will appear and show the result in realtime. The window will only show data when a packet is matching for the first time, otherwise it will stay empy.